

If you’ve ever stared down a tough cut of chuck roast and wondered whether to braise or stew it, you’re not alone. Both techniques fall under the low-and-slow moist heat cooking umbrella, breaking down tough connective tissue into juicy, flavorful results – but they are not interchangeable. Mix them up, and you could end up with dry, stringy meat or a watery, flavorless sauce instead of the tender, rich dish you envisioned. In this guide, we’ll break down the exact differences between braising and stewing, share chef-backed secrets to perfect results every time, and help you choose the right method for any ingredient or meal.
Core Definitions: What Are Braising and Stewing, Exactly?
At their base, both braising and stewing use extended, low-heat cooking in liquid to transform tough, inexpensive cuts of meat and hardy vegetables into tender, flavorful dishes. The core difference lies in the amount of liquid used, the size of the ingredients, and the final texture of the dish. Braising is a two-step process that combines dry-heat searing with moist-heat simmering, while stewing relies entirely on fully submerging ingredients in liquid for the entire cook time. Understanding these core distinctions will help you avoid common cooking pitfalls and get consistent results every time you step into the kitchen.
Braising Deep Dive: Technique, Best Cuts, and Pro Tips
Braising is one of the oldest and most reliable cooking methods for transforming tough, well-exercised cuts of meat into fall-apart tender, flavor-packed dishes. The two-step process – first searing at high heat, then slow simmering in a small amount of liquid – creates layers of flavor you can’t achieve with any other single technique.
How Braising Works
The first step of braising is a high-heat sear, which triggers the Maillard reaction: a chemical process that creates hundreds of complex, savory flavor compounds on the surface of the meat. After searing, you add a small amount of liquid (broth, wine, beer, or even tomato sauce) that only covers ⅓ to ½ of the meat. The pot is sealed with a tight-fitting lid, and the dish cooks at a steady low simmer (180–200°F / 82–93°C) for 2–4 hours, either on the stovetop or in the oven. Oven braising is often preferred for even heat distribution, as stovetop burners can create hot spots that cause uneven cooking. As the meat cooks, collagen (the tough connective tissue that makes cheap cuts chewy) melts into gelatin, which bastes the meat from the inside and gives the sauce a silky, rich texture.
Ideal Ingredients and Cuts for Braising
Braising works best with large, tough cuts of meat that have high collagen content, as well as hearty whole vegetables that hold up to long cook times. Top meat picks include:
- Beef chuck roast, short ribs, or brisket
- Pork shoulder or pork butt
- Lamb shanks or shoulder
- Chicken thighs or whole Cornish hens
- Turkey legs
For vegetarian braising, whole heads of cabbage, cauliflower, fennel, or large root vegetables like parsnips and celeriac work beautifully, especially when cooked in flavorful liquid like coconut milk or vegetable broth.
Pro Tips for Perfect Braising
- Pat meat completely dry before searing to ensure a golden crust, not steamed, gray meat.
- Don’t skip the sear: it adds 80% of the dish’s final flavor.
- Avoid lifting the pot lid for the first 2 hours of cooking, as dropping the temperature will extend cook time and can cause muscle fibers to seize up.
- Let braised meat rest for 10–15 minutes before slicing or shredding to keep juices from running out.
- Always slice meat proper meat slicing technique against the grain to shorten muscle fibers and reduce chewiness.
 Vegetarian braising works beautifully with hearty produce like cabbage, cooked in creamy cashew milk for a dairy-free, flavorful dish
Image source: food52.com
Vegetarian braising works beautifully with hearty produce like cabbage, cooked in creamy cashew milk for a dairy-free, flavorful dish
Image source: food52.com
 Braised beef shanks, a classic dish that showcases the tender, fall-off-the-bone texture braising produces
Image source: www.reluctantgourmet.com
Braised beef shanks, a classic dish that showcases the tender, fall-off-the-bone texture braising produces
Image source: www.reluctantgourmet.com
Stewing Deep Dive: Technique, Best Cuts, and Pro Tips
Stewing is the go-to method for quick, hearty, one-pot meals that pack maximum flavor into every bite. Unlike braising, all ingredients are fully submerged in liquid for the entire cook time, creating a thick, savory broth that works as a sauce, soup base, or side for grains and bread.
How Stewing Works
Stewing starts with cutting meat and vegetables into uniform 1–2 inch cubes to ensure even cooking. The meat is first browned in batches (to avoid overcrowding the pot, which lowers the temperature and causes steaming instead of browning), then deglazed with a splash of wine, vinegar, or broth to pick up all the flavorful browned bits (called fond) stuck to the bottom of the pot. Vegetables and seasonings are added, then enough liquid to fully cover all ingredients. The pot is sealed and simmered gently for 1–2.5 hours, until the meat is tender and the sauce has thickened slightly. Because all ingredients cook together in the same liquid, flavors meld fully, creating a cohesive, hearty dish.
Ideal Ingredients and Cuts for Stewing
Stewing works best with tough, collagen-rich cuts that can be cut into uniform cubes, as well as hearty vegetables that hold up to long simmering. Top picks include:
- Beef chuck, trimmed of excess fat and cut into 1-inch cubes
- Pork shoulder, cut into bite-sized pieces
- Lamb shoulder or leg, cubed
- Chicken thighs, cut into 1.5-inch pieces
- Carrots, potatoes, celery, parsnips, and turnips (add soft vegetables like peas or spinach in the last 10 minutes of cooking to avoid mush)
- Legumes like chickpeas, black-eyed peas, or cannellini beans for vegetarian stews
Pro Tips for Flawless Stewing
- Brown meat in small batches to avoid overcrowding the pot, which lowers the oil temperature and leads to steaming instead of searing.
- Deglaze the pot after browning meat with ¼ cup of red wine, apple cider vinegar, or broth, scraping up all the fond from the bottom for extra flavor.
- Add delicate vegetables (peas, spinach, zucchini) in the last 10–15 minutes of cooking to prevent them from turning to mush.
- Skim excess fat from the surface of the stew halfway through cooking for a cleaner, less greasy sauce.
- For extra depth, add a tablespoon of tomato paste when you add the liquid to build a rich, savory base.
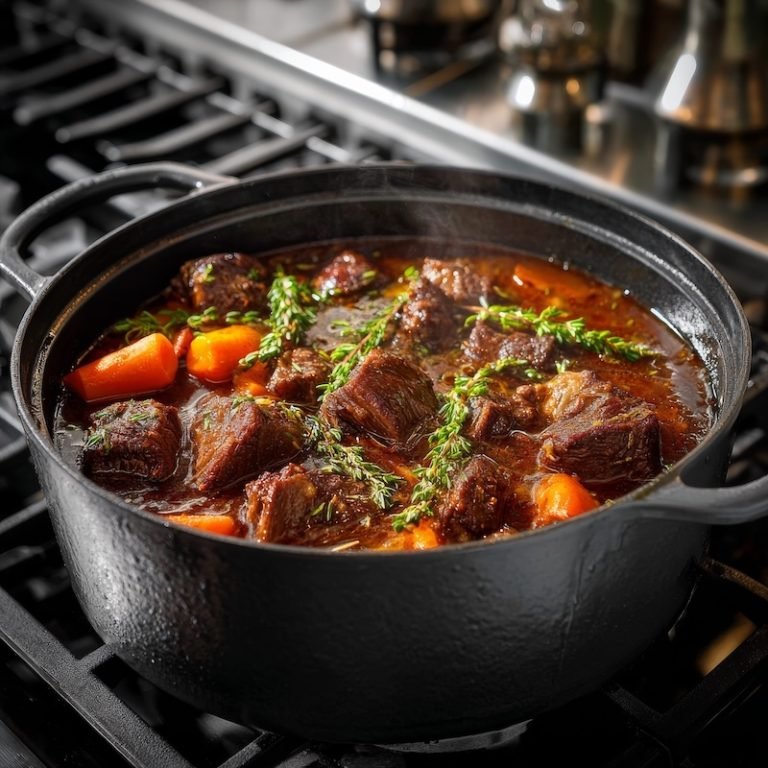 A classic beef stew, with fully submerged ingredients in a thick, savory broth ideal for serving over crusty bread or egg noodles
Image source: www.reluctantgourmet.com
A classic beef stew, with fully submerged ingredients in a thick, savory broth ideal for serving over crusty bread or egg noodles
Image source: www.reluctantgourmet.com
Braising vs. Stewing: Key Differences at a Glance
To make the differences between the two methods easy to reference, use this quick comparison table:
| Parameter | Braising | Stewing |
|---|---|---|
| Liquid level | Partially submerges ingredients (1/3 to 1/2 coverage) | Fully submerges all ingredients |
| Ingredient size | Large, whole or 2-3 inch chunks | Uniform 1-2 inch bite-sized cubes |
| Typical cook time | 2–4 hours (stovetop or oven) | 1–2.5 hours (stovetop) |
| Ideal cookware | Wide, heavy Dutch oven or oven-safe skillet | Deep, heavy-bottomed pot or Dutch oven |
| Sauce consistency | Thick, concentrated, clings to meat | Thin to medium broth, served as a base for sides |
| Best for | Tough, large cuts of meat, whole vegetables | Bite-sized meat, mixed vegetables, legumes |
Common Mistakes That Ruin Both Methods (And How to Fix Them)
Even experienced home cooks make small errors that ruin low-and-slow dishes. Avoid these frequent pitfalls for perfect results every time:
- Skipping the sear: The Maillard reaction is responsible for 80% of the dish’s final flavor. Skipping it leads to flat, boring results. Fix: pat meat completely dry before searing, heat oil until it shimmers, and don’t move the meat for 2–3 minutes per side to get a deep golden crust.
- Using lean cuts: Lean meats like sirloin or chicken breast have almost no collagen, so they dry out even when cooked in liquid. Fix: stick to tough, fatty cuts with high connective tissue content for both methods.
- Boiling instead of simmering: High heat causes muscle fibers to seize up, turning meat tough and chewy. Fix: keep the temperature between 180°F and 200°F (82°C–93°C) for both methods. For official safe cooking guidelines, refer to USDA slow cooking safety guidelines.
- Overcooking soft ingredients: Vegetables like carrots and potatoes hold up well to long cook times, but delicate ingredients like peas, spinach, or zucchini turn to mush if added too early. Fix: add soft ingredients in the last 10–15 minutes of cooking.
- Not resting meat before serving: Cutting into braised meat immediately causes all the juices to run out, leaving it dry. Fix: let braised meat rest for 10–15 minutes before slicing or shredding.
When to Choose Braising vs. Stewing for Your Next Meal
While both methods produce tender, flavorful results, each is better suited for specific use cases, ingredients, and schedules.
Best Use Cases for Braising
Braising is ideal for large, whole cuts of meat that need long, gentle cooking to tenderize. It’s perfect for make-ahead meals, as braised dishes often taste better the next day after flavors have had time to meld. Braising also works well for dishes you want to serve with a concentrated, sauce-like topping: think braised short ribs, coq au vin, or osso buco. Leftover braised beef makes excellent savory slider fillings for casual weeknight meals, or can be shredded for tacos. For a restaurant-worthy braised meat for Mexican dishes, try this braised taco fillings recipe that uses pressure cooking to cut cook time without sacrificing flavor.
Best Use Cases for Stewing
Stewing is the best choice for quick, one-pot weeknight meals, especially when you’re working with pre-cut stew meat or budget-friendly cuts. It’s also ideal for vegetarian meals, as the fully submerged liquid cooks legumes and vegetables evenly without drying them out. For a hearty, plant-based option, try hearty legume stews that use smoked paprika and tomatoes to add deep, smoky flavor without meat. Another popular pick is this plant-based stew variations recipe that combines tender kale and creamy cannellini beans for a nutrient-dense, filling meal. Stews also work beautifully as a base for grain bowls, topping for baked potatoes, or dipping sauce for crusty bread.
Frequently Asked Questions
What is the main difference between braising and stewing?
The core difference is the amount of liquid used and the size of the ingredients. Braising uses large cuts of meat partially submerged in a small amount of liquid, producing a thick, concentrated sauce and tender, intact meat pieces. Stewing uses small, uniform cubes of meat and vegetables fully covered in liquid, creating a thinner, hearty broth and very soft, bite-sized pieces. You can reference the comparison table above for a full side-by-side breakdown.
How long does braising take compared to stewing?
Traditional stovetop or oven braising takes 2–4 hours, depending on the size of the cut. Stewing typically takes 1–2.5 hours for meat to become tender. If using a slow cooker, braising takes 6–8 hours on low, while stewing takes 4–6 hours. For an Instant Pot, braising takes 45–60 minutes at high pressure with a 10-minute natural release, while stewing takes 25–35 minutes at high pressure with the same natural release.
Which method is healthier: braising or stewing?
Both methods are far healthier than high-heat frying or grilling, as they require minimal added fat and preserve more water-soluble vitamins than dry-heat methods. Stewing often includes a higher volume of vegetables and liquid, so it can have a higher vitamin and fiber content. Braising produces more collagen-rich gelatin from the meat, which supports gut health and joint function. Both are excellent options for balanced, nutrient-dense meals, as long as you avoid adding excess salt or fatty sauces.
Can I use the same cuts of meat for braising and stewing?
Yes! Tough, fatty cuts with high collagen content (chuck, pork shoulder, lamb shanks, chicken thighs) work for both methods. The only difference is the size: use a 2–3 pound whole cut for braising, and cut it into 1–2 inch cubes for stewing. Avoid lean cuts like sirloin or chicken breast for either method, as they will dry out even when cooked in liquid.
Do I need to brown the meat before braising or stewing?
Browning is not strictly required for food safety, but it is highly recommended for flavor. The Maillard reaction created during searing produces hundreds of savory, complex flavor compounds that you can’t replicate with liquid alone. If you’re short on time, you can skip the sear, but your final dish will be noticeably flatter in taste.
Can I make braised or stewed dishes ahead of time?
Absolutely. Both methods taste better the next day, as flavors have time to meld and deepen. Store leftovers in an airtight container in the refrigerator for up to 4 days, or freeze for up to 3 months. Reheat gently on the stovetop over low heat to avoid toughening the meat.
Conclusion
Braising and stewing are both incredibly versatile, low-effort cooking methods that transform tough, inexpensive ingredients into tender, flavorful meals with minimal hands-on time. The core differences come down to liquid level, ingredient size, and desired final texture: braising is best for large cuts you want to serve with a concentrated sauce, while stewing is ideal for quick, one-pot meals with a hearty, saucy broth. By avoiding common mistakes like skipping the sear or boiling instead of simmering, you’ll get consistent, restaurant-quality results every time.
Now that you understand the exact differences between braising and stewing, it’s time to put your new skills to work. Whether you’re braising a fall-apart short rib for a weekend dinner or whipping up a quick weeknight stew, these techniques will help you get tender, flavorful results every time. For more tested home cooking guides and foolproof recipes for every skill level, browse our full tested home cooking guides library to elevate every meal you make.

Hi, I’m Daniel Brooks—a food lover and kitchen gear enthusiast. I enjoy testing cookware, utensils, and gadgets to see what really works in everyday cooking. At seashell-kudu-262783.hostingersite.com, I share honest reviews, comparisons, and simple guides to help you choose the best tools for a safer, smarter, and more enjoyable kitchen.
Related posts:
 How to Make a Fruit Basket for a Gift: Easy DIY Guide
 Do You Need a Basket? Essential Guide for Air Fryers
 Stainless Steel Appliances in a White Kitchen: Stylish Harmony
 Kitchen With White Cabinets And Stainless Steel Appliances: Timeless Elegance
 Culinary Evolution Smart Kitchen Appliances Leomart: Transform Cooking
 How to Clean Kitchen Sink Drain Smell: Easy Tips to Eliminate Odors

